Wednesday, March 28, 2012

Project Life: Organizing the Loot

**PRE-POST DISCLAIMER** The organization methods you are about to see are not, in any way, fancy or perfect. I am in a "split living" situation as a college student (last year YAY!) and am working with the limited space available at the moment.* HA!

I have posted previously about my scrapbook studio at my parent's house quite awhile back, (although I've made changes and need to repost that soon...another to do on a mile long list) however, I have recently unofficially moved in with my boyfriend at his apartment while we save for a house of our own. I am here enough that I could justify bringing some of my scrapbook stuff with me. (mostly things I will use for Project Life. I go "home" to my parents when I want to do full layouts) I wanted to show what I was using here at Chris's to demonstrate a way to make do with a smaller space.


After graduating high school, I purchased a bunch of these white cubes from target for around $25 each. I believe Hobby Lobby or Michael's now carries something similar. They work great for organizing all sorts of supplies and come in many styles. These drawers are large enough to fit a little over a 12x12 sheet of paper which is great!

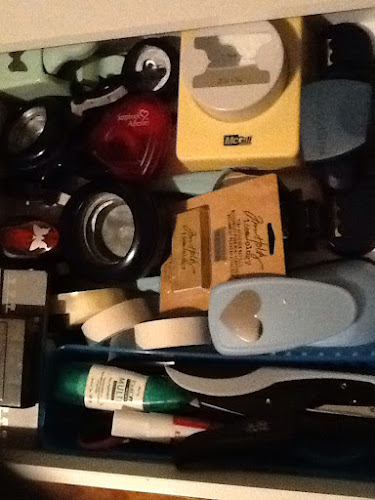
My top, left drawer is filled with adhesives and tools. The drawer isn't much more organized than that. There is a good mix of my favorite punches, adhesives, pens, and scissors floating around in there somewhere. Ha!
 

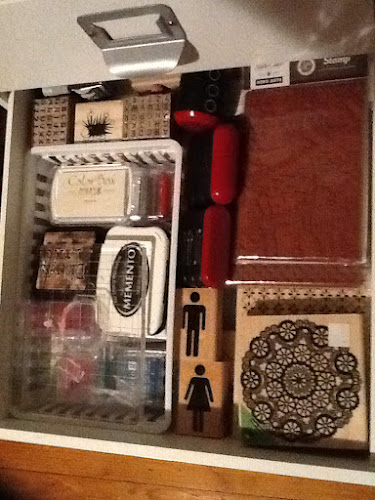
The next two drawers on the left are dedicated to stamping. The first houses a handful of inks, (most are Studio G from Walmart, plus a couple other favorites) although, the majority of my inks are back at my parents. I also keep background type stamps in the drawer, along with a few wood mounted ones. I am really loving the new stamp sets from Studio Calico! They are getting a lot of use in this project. The third drawer is a random mix of more favorite stamps that lend themselves well to this project and broad themes.
 

The fourth drawer on the left is home to my letter stickers. It is stocked full of letter stickers. It is hard to tell in the picture (should have rearranged things for the picture...note to self in the future Ha!) but under that 12x12 Echo Park sticker sheet there are piles of Thickers and other letter sticker packages. I might have an obsession with those.. The glitter ones are my current favorite ones right now..you'll notice in my week spreads soon.


The fifth drawer houses my washi tape, twine, and rhinestones. The washi tape and twine is separated in the drawer with an old wooden cheese box. At is the only extra organization I have within the drawer. Washi and twine get used on pretty much every spread so I like being able to pull the cheese box out of the drawer and bring it to wherever I am working (usually the floor..occasionally the coffee table).


The bottom left drawer has a mix of scrap patterned paper that relatively coordinate my bright theme for the Album. Definitely no organization in that drawer. It's not my entire stash so it's no big deal to sift through the whole pile quickly for what I need.


The top right drawer is stuffed full of a random mix of journaling stuff. Everything from labels to 3x4 cards...and anything in between...related to journaling. So far I don't have any further organization for that, however, I am considering different options possibly. For now it is getting the job done.


Under that drawer is other embellishment products. Little bits and pieces I pulled from my main stash that I thought I'd want for the project. I find myself occasionally thinking of something else I wished I brought over from my parents, this drawer continually grows each time I visit their house! Ha!


The last drawer holds collection kits and a few favorite papers. I really like Echo Park's collection kits, so several of those are in this drawer.


Underneath the drawers is a square opening in which I put a black canvas bin from Walmart. This bin is a catch all for things I don't have a place for. I don't print to many pictures that I'm not ready for, however the few I have are in here until I use them, computer paper and white card stock is in here as well. I don't have any colored card stock at Chris's, other than scraps, because I use mostly white for my backgrounds with stamps. I also keep protectors, memorabilia, and my paper trimmer here! The top of the cubes is just big enough for my simple, cheap printer (printing pictures at Walmart or Snapfish if I plan enough in advance) and my actual album!


And that is my current organizing methods! I am constantly reorganizing as I find things that aren't working or as my stash grows. And sometimes just because I'm bored (I'm one of those weird people who actually enjoys organizing). I hope you found someone useful from this post and will join me tomorrow as I start sharing my progress so far this year!


Sunday, March 25, 2012

Project Life: Planning

FINALLY! I'm not sure why, but I have typed.and retyped. put off. and procrastinated writing this post. I knew what I wanted to accomplish...share my project life journey in a series of posts with a background in how I plan and organize for this new adventure. So FINALLY. No more silly excuses. I AM GOING TO FOLLOW THROUGH THIS TIME.

*A special thanks to the IPAD app Blogsy for removing the validity in my excuses and making me face my fears* HA!

So...without further ado...

PROJECT LIFE POST #1: PLANNING

The end of last year I made the decision to take on the project life journey for 2012. (probably the best/easiest decision I've made HA!) After making this decision my next immediate thought? "This is going to take some serious planning..and detailed notes!" Off to Wal-Mart I went for a new planner.

Important things to consider: must be big enough to keep everything in one place. appointments and important dates. homework assignments for the new semester. day to day detailed notes for the album. yet it needed to be small enough to fit in my purse. (which if you saw the size of my purse...this isn't much of a stipulation. HA!) Here is what I came up with:


RULE #1 TO MAKING THIS WORK: keep a camera and your planner on you at ALL TIMES

The monthly calendar spread works perfectly for assignments, appointments, and important dates. The weekly layout with larger daily squares? You guessed it...new home for all the notes and happenings Project Life related. My planner uses a Monday to Sunday week, so my album will follow suit. (because let's face it..who wants to flip between two pages when working on a week's spread?!)


(I almost always have little notes attached to my planner..I'm a list maker..paper clips and I are well acquainted. HA!)

When I scrapbook, I love working with sketches! They give me a plan. A jump start to create. Do I always follow them in the end? Nope. But that's not my point for them. Project Life was no exception for me. I knew I would probably put each week together all in one sitting. My schedule wouldn't allow it any other way really. I do, though, have time throughout the week to fill in a sketch. Good ol' plain post-it notes work wonders. Each week, I stick 2 post-its somewhere on the week's pages. (they're moveable after all) I'm using Project Life design A protectors, so I doodled that layout on my post-its with a sharpie pen. I fill in the squares with a pencil (I move things around a lot. Erasing is essential) with the planned contents for that pocket. If I have an insert that week, additional post-its are added.


So far this has worked great for me. I feel like this takes the stress away when I sit down to put it all together. Having the sketch to go by speeds the process up so I can spend the extra time embellishing and making it pretty!

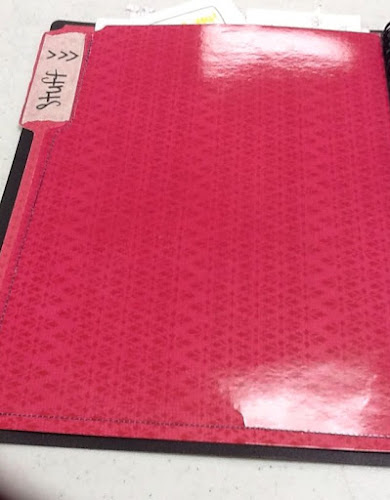
I love that Project Life is a place to include everyday moments and the "stuff" that makes up our lives. I needed a place to keep all of that stuff together, as I collect it. I stitched a little file folder together on 3 sides, making a pocket. Using glue dots, I attached it to the inside of my planner to store all the little bits I collect throughout the week.


When I put together my pages I also check both facebook and twitter for posts I might want to include.

My planner and method of keeping track of everyday events are nothing fancy, but they are working for me. I hope that after this post, you may have found something useful that will help make this journey easier for you. Check back tomorrow for a post about how I organize my supplies!


Monday, January 9, 2012

Monday Moodboard

I had a bit of a busy end to last week. I am not so patiently waiting the arrival of my first niece...any day now! Along with the anticipation from that, I had to help get ready for a baby shower for my cousin. It seems like everyone around me is expecting little ones! :) I missed last Friday's post for 52 Friday, a post where I follow through Elizabeth Kartchner's book with Creating Keepsakes, 52 More Scrapbooking Challenges. However, following another one of my 2012 resolutions not to stress I am going to try not to beat myself up over it.

It actually put me on track for the year with the book. Last fall when I started posting daily inspiration and projects I began with week one. This Friday will be the second week in 2012 so we will begin with week 2's challenge!

For today's Monday Moodboard I have pulled several images from Pinterest to get inspired by. I really like the geometric pattern I have been seeing all over. Here is the moodboard I have created:


(This mosaic was created using this flickr mosaic maker).

I recently stumbled across a background design in my Silhouette Studio store that was the same pattern as the geometric design in the moodboard! I decided to create my own background by cutting this pattern out of white cardstock and adhering it to a piece of kraft cardstock. I really liked the mix of white, kraft, and teal in the moodboard as well. I decided to use this color combination for my layout. These colors were also used in a previous post last week with pictures from the annual float trip last year. I still had some photos from this event so decided to create another layout to correspond with the first. Here is the layout I created:

Supplies Used:
kraft, brown, and white cardstock
Silhouette Cameo
Yellow embossed cardstock (Bazzil)
Yellow polka dot PP (My Minds Eye)
vintage book paper
felt flower ribbon (Creative Cafe)
"Summer" & "2011" (Studio Calico)
"fun" (American Crafts)

I hope you were inspired by this weeks Moodboard and will use it create your next project. There are many different companies that have patterned papers in this design on the market now! Use one of those or create your own like I did.

Thursday, January 5, 2012

Technique Thursday

Hey guys I decided to switch it up a bit from last fall for the Thursday post. For 2012 I decided I would do a technique Thursday. There are many great techniques using tools and products in different ways that I also think "Oh! I want to try that" but then never get around to it. I decided to inspire me to finally get to it, I would dedicate a day for it!

One tool that I bought awhile back was the Martha Stewart scoring board. I just knew that this product was going to be my go to tool on my pages and cards. In reality I tend to forget about pulling it out when I am creating. Oh but not today!

This tool can be used for more things than just the ordinary creasing cards and envelopes. For this layout, I used the scoring board to create these darling flowers! I also used the tool to create an accordion insert for additional pictures! Here is the project I created:

Supplies Used:
Kraft, brown, and pink cardstock
Basic Grey Manila patterned paper
Vintage music sheet
fiskars punches (sm. heart, circle)
Martha Stewart butterfly punch
Marvy Uchida XL heart punch
Martha Stewart scoring board
Cuttlebug houndstooth embossing folder
small letter stickers("open") by Echo Park
Echo Park pattern paper(pink plaid)
pink polka dot paper by unknown? old from stash possibly DCWV
silhouette die cutting machine
bakers twine
vintage lace

I hope you have been inspired to create something using your scoring board!

Wednesday, January 4, 2012

Words of Wednesday!

For today's Words of Wednesday post I am going to focus on mixed material titles. A big trend right now is making a title that covers a large portion of your page using different materials and colors. I really love the interest and texture this creates so I decided to give it a try! Here is the LO I created using this technique:

I challenge you to create a LO or project of some kind using a large mixed material title.
Supplies used:
Kraft cardstock(staple in my scrapbooking)
Woodgrain PP by Hambly(cut in Chevron pattern)
Script PP by Basic Grey(cut in Chevron pattern)
"We" "A" letters by Darice
"Enjoying" by American Crafts
"Lazy" by American Crafts
"Day" by Studio Calico
"on" by American Crafts
"the"by American Crafts
"water" paper by Echo Park cut with silhouette
heart paper by My Minds Eye cut with Marvy Uchida XL punch
Washi tape by American Crafts

Tuesday, January 3, 2012

You Betcha Sketch Tuesday!

Sketches are always a great starting place when I am having trouble feeling crafty and inspired! They are so versatile! Many times my end project looks nothing like the sketch I started with, other times it is clearly similar. For today, I pulled a sketch from Studio Calico to start me off. Here is the sketch:

As you can see from my final project, I stuck pretty closely to the sketches layout. I really liked the design from this one and wanted to keep the main setup. Here is the LO I created about my 2012 resolutions:

Most of the supplies I used came from the Echo Park Happy Days collection. I also added in some American Crafts Thickers and Martha Stewart glitter for my title.

I hope you were inspired by today's project and sketch and decide to join in on the fun!

Monday, January 2, 2012

Moodboard Monday!

Hello new year! I started my daily blog posts last October with good intentions. I was off to a good start the first week, but as most of my crafty ideas go, life became busier than I could keep up with. I decided after several failed attempts to try and get back into it I would wait until after the holidays and my mom recovered from surgery and restart with a clean slate in January and give it another go. I am going to change up a few daily topics from last fall and keep the others.

We are going to start the week off with Moodboard Mondays again! Like many other crafters, I am inspired from many things around me. I like finding a photo or group of photos that spark my interest to challenge me for my projects.

This Monday, I have found many things to guide my crafting. I hope you will join me in creating something inspired from this moodboard.

Images from Pinterest
From this moodboard I was really drawn to the color combination of red, yellow, and brown. These colors had a very outdoorsy feel to me which worked great for the photos I had from my family's annual float trip last summer. Here is the LO I created!


For this project I used a wide assortment of label stickers and journaling and accent squares from many different manufactures to copy the graphic "collagey" feel from the first picture in the moodboard. I hope you enjoyed today's project and are inspired to create one of your own.